Building a garden bed doesn’t have to be complicated, costly or involve power tools. Most home gardeners can build a basic raised or framed garden bed with just a few simple hand tools, some sturdy materials and a little time. This makes the project more accessible to beginners, renters, budget conscious gardeners or anyone looking for a practical do-it-yourself approach. Growing vegetables, herbs or flowers in a homemade garden bed is a great way to create a tidy, productive growing space.
Working with only simple hand tools has one of the biggest benefits of simplicity. You don’t need a workshop full of gear to get started. With tools such as a hand saw, hammer, measuring tape, screwdriver and level, you can create a long-lasting garden bed that looks tidy and works well in virtually any outdoor space. This method also gives gardeners more confidence, because the project is easier to control and understand, step by step.
In this guide, we’ll show you how to build garden beds, using nothing but basic hand tools. We’ll cover everything from choosing the right location and materials, to building the frame and filling it with good soil. The aim is to prove that anyone with patience and careful planning can achieve this project. By the end you’ll have a working garden bed ready for planting and a better idea of how to create one without expensive tools or advanced carpentry skills.
Why Build a Garden Bed by Hand?
One of the best and most rewarding ways to get started with a garden is to build yourself a garden bed by hand. This allows you to have complete control over the design, materials and final setup without the need for expensive power tools or advanced building skills. This method is often easier for gardeners to follow, especially those new to the hobby, because it breaks the project down into simple, manageable steps. With patience, basic tools and careful planning you can make a useful and attractive garden bed without machinery or a workshop full of equipment.
One of the big reasons to build a garden bed by hand is accessibility. Not everyone has a power saw, drill, or other specialized tools, and many people don’t want to buy such tools for one gardening project. Build a garden bed by hand and that barrier is gone. Often all the tools you need are a hand saw, hammer, screwdriver, measuring tape and level. This makes the project more affordable and easier for homeowners, renters and hobby gardeners who just want a usable growing space without extra cost.
Another big plus is accuracy and control. Doing things by hand is slower and this is good because it reduces mistakes. You have more time to measure carefully, to check the alignment again and to make adjustments before each piece is fastened down. This is especially useful for first-time builders who may feel intimidated by fast-moving power tools. Building by hand makes it easier to maintain a steady pace, allowing you to concentrate on proper placement, stable corners and a uniform structure that will hold soil well.
Building a garden bed by hand also allows a better connection to the project itself. There is a special satisfaction in making something useful with your own hand. Every cut, every measurement, every step of the assembly ends up in the final product. That feeling of accomplishment can make the garden bed more unique and special. Many people find gardening to be a tactile, relaxing experience, and building the bed in the same spirit adds to the experience.
Hand-built garden beds are also great for small spaces and custom designs. You can customize the size, height and shape to your yard, patio or growing needs. Building it by hand makes it easier to customize without complicating the process whether you want a compact herb bed, a medium-sized vegetable bed or a simple flower border.
Building a garden bed by hand is all about simplicity, confidence, and functionality in the end. It just goes to show you don’t need the most expensive equipment to make a productive garden space. With a few simple tools and a little effort, you can build a sturdy garden bed that will promote healthy plants and give you the satisfaction of completing a useful DIY project on your own.
Benefits of Using Basic Hand Tools
Building a garden bed with modest hand tools has many real benefits, especially for beginners and first-time home gardeners wanting a quick and affordable way to start a project. Power tools can speed up some of the tasks, but are not always needed to build a garden bed that sounds and looks good. In many cases hand tools offer enough function, control and flexibility to finish the job successfully without the extra cost or complexity.
The cost is one of the biggest benefits of basic hand tools. Many gardeners already have common tools such as a hammer, screwdriver, measuring tape, hand saw, and shovel. If not, these tools are usually inexpensive to buy and will come in handy for many other household and gardening tasks in the future. That is why hand tools are a smart choice for those on a budget. Better to spend your money on better wood, soil, compost and plants than on power equipment, batteries, accessories or rental fees.
It is also easy to use which is another big benefit. Basic hand tools are generally simple, and easy for beginners to use. For instance, a hand saw might demand more effort than a circular saw, but it is frequently easier for a novice builder to manage. The same goes for manual screwdrivers, hammers, and levels. They help you to work through it step by step without feeling rushed or overwhelmed. This slower pace can make things much more comfortable and manageable for do-it-yourselfers who are new to it.
Hand tools also provide more control and accuracy in many situations. You have the luxury of time to measure, adjust and inspect each piece before proceeding on, since you’re doing this by hand. This minimizes mistakes and allows you to make a more level, stronger garden bed. You don’t have to move fast with power equipment, so it’s easier to catch small measurement or alignment errors. In a project like a garden bed, where straight edges and stable corners are important, that extra control can make a big difference to the end result.
Another big plus is safety. Power tools can seem intimidating, especially to a beginner with little building experience. They need more attention to electrical safety, blade handling and proper storage. Basic hand tools are not without risk, but they are generally easier to handle and less likely to result in serious accidents if used with care. This makes them a more user-friendly option for home growers, families, and those looking for a less stressful DIY experience.
You should also consider portability and convenience. Hand tools are portable and can be stored and used almost anywhere. You do not need access to electricity, extension cords, or a dedicated shop. You can take your tools straight into the garden and work where the bed is to be built. This is perfect for small backyards, community garden plots, rental properties and places with limited power.
Simple hand tools also allow for a more deliberate, tactile building process. A lot of gardeners like the physical connection that comes from making something through their own efforts. It’s practical, personal and satisfying to build a garden bed by hand. It transforms the project from construction into part of the gardening process itself.”
In summary, simple hand tools make building garden beds easier, cheaper, safer, and more fun. It enables more people to tackle the project with confidence, even without special equipment. With patience and basic tools you can create a long-lasting garden bed and take pride in having built it yourself.
How to Select the Best Location for Your Garden Bed
One of the most important steps to the whole building process is choosing the right location for your garden bed. A well constructed garden bed will not perform well if it is installed in a poor location. The right location also gives your plants plenty of sun, good drainage, and easy access for watering, tending and harvesting. Before you begin to measure wood or assemble the frame, it’s worthwhile to take the time to survey your outdoor space carefully.
One of the first things to think about is sunlight. Most vegetables, herbs and many flowering plants need at least six to eight hours of direct sun each day. Leafy greens and a few shade-tolerant plants can get by on less, but usually a sunny spot offers more planting options and better results. Look in your yard during the day to see where the sun shines the most. Watch out for spots that look bright in the morning but are later shaded by fences, walls, trees or buildings. In general, a spot with consistent sun is the best bet for a productive garden bed.
Drainage is a big factor too. Don’t site garden beds where water collects naturally after a rain. Poor drainage results in waterlogged soil, rotting, fungal problems, and weak plant growth. Choose a site that is naturally fairly dry and free-draining. If puddles are forming in some areas of the yard, it is best to stay away from those areas. It’s better if it’s slightly level because it’s easier to build the bed and the water will spread more evenly across the soil.
Convenience is also more important than most people realize. A garden bed should be accessible and easy to maintain. It can be a chore to water if you’re away from a water source, especially in hot weather. If it is stashed in a hard-to-reach corner of the yard you might not be inclined to check on your plants as often. A spot near your home, patio or walkway can add to the fun of gardening and encourage daily care. Easy access is particularly handy when you have to weed, prune, feed plants, or harvest vegetables in a hurry.
You should also consider the surrounding environment. Tree roots will compete with garden plants for water and nutrients, so don’t place a bed too close to large trees or aggressive shrubs. Overhanging branches can also shade too much, and drop leaves or other debris in the bed. Wind exposure is another issue. Very open areas can have very strong winds that dry out the soil quickly and damage delicate plants. If you can, pick a place that has some natural protection but isn’t completely blocked from the sun.
Also, think about what size and layout your yard has. Leave enough space not only for the garden bed itself, but also for comfortable movement around it. If you can access the bed from more than one side you’ll need room to bend, weed, water and harvest from all sides. Don’t jam a bed into a tight space where it’s hard to get to.
Ultimately, the best location for a garden bed is sunny, well-drained, accessible and practical for long-term care. Investing in the right location will pay off from the start in better plant health, increased yield and an overall more enjoyable gardening experience.
Deciding on the Size and Shape of the Bed
The first step is to decide what size and shape your garden bed will be. This will help determine how easy the bed will be to build, plant and maintain. An attractive garden bed can become a nuisance quickly when it is too wide, too long, or too awkwardly shaped. The concept behind designing your bed is to select dimensions that fit the space you have, your gardening needs and your comfort zone, while still being practical to build with basic hand tools.
Access is one of the most important things to remember. You should be able to walk to the middle of the garden bed without stepping into it. Getting into bed can pack down soil, reducing airflow and making it more difficult for roots to develop properly. So many gardeners keep raised or framed beds to about 3 to 4 feet wide. This width makes it easy for most people to get to the middle from either side. If the bed will only be accessible from one side, then a narrower width might be better.
The width of the garden bed is more flexible, usually based on how much space you have. Most beds are 6 to 8 feet long, but shorter or longer beds can be successful. A longer bed gives you more planting space, but needs more materials, more soil and more work to keep up. If you’re new to it, it’s usually better to start with a single manageable bed, instead of building a really big one straight away. A small bed is easier to water, weed and keep an eye on and can always be made larger later if you choose.
Height is another big factor. For a simple garden bed built directly in the ground, 6 to 12 inches of height is enough for many flowers, herbs and vegetables. This gives you a defined growing area and helps to improve soil depth. If your native soil is poor, rocky or compacted, or if you’d prefer easier access and less bending over, taller beds can be helpful. But larger beds use more material and require more soil to fill, adding to the cost and labor. For a simple hand-tool project, a low- to medium-height bed is typically the most practical starting point.
As far as shape goes, rectangular beds are usually the easiest to build and maintain. They are easy to measure, cut and assemble with basic tools and they make good use of space and materials. Straight sides also assist in arranging plants in rows, grids or sections. Square beds are great for tight spaces, especially small kitchen gardens. More decorative shapes, such as curved or L-shaped beds, may be visually appealing but are often more difficult to construct accurately without the benefit of advanced tools and tend to generate wasted planting space or awkward corners.
Also think about how the bed will fit into the overall plan of your yard or garden. Leave space to walk, water and harvest. The paths should be comfortable, not cramped. A good size bed can feel useful without taking over the whole space.
Ultimately, the best garden bed size and shape is one that is accessible, easy to maintain, and suitable to your space. Begin with a simple rectangular shape and manageable size to make the building process easier and get better gardening results.
Best Materials for Building a Simple Garden Bed
Choosing the right materials is an important step when building a simple garden bed, as the materials used will determine the strength, durability, aesthetics and cost of the bed. When building with only basic hand tools it is usually best to keep things simple and practical. The ideal material should be easy to cut, handle, assemble and maintain, but provide a sturdy structure that can hold soil and support healthy plant growth.
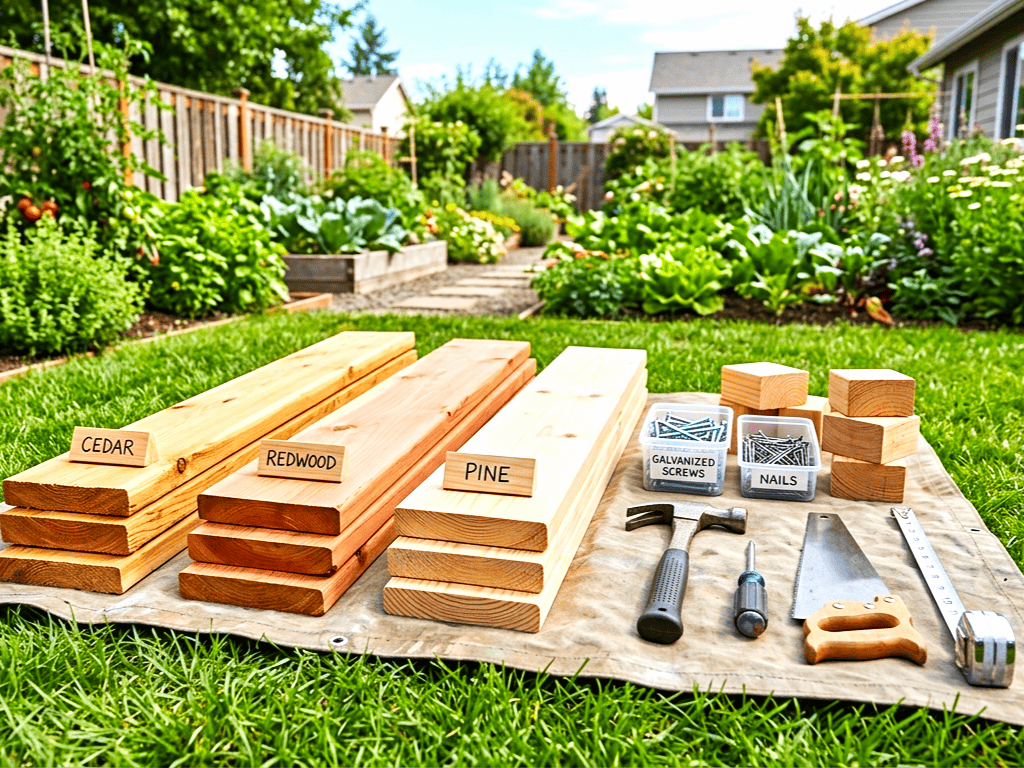
Wood is one of the most popular and beginner friendly material to build a garden bed. It is easy to work with, readily available and relatively cheap with hand tools like saw, hammer, screwdriver and measuring tape. Wooden boards can be cut to size, and then assembled into a simple rectangular frame and secured together with relative ease. This makes wood a very practical choice for gardeners who want a simple do-it-yourself project.
Untreated cedar and redwood are often touted as some of the best options among wood options. The woods are naturally more resistant to rot and insect damage than many other types of lumber, helping the garden bed last longer outdoors. They can be more expensive up front, but often are worth considering if you want a bed that will last well for several years. They also have a pleasing natural look and fit well into most garden settings.
Pine is another favored material and tends to be a lot more budget friendly. It is typically more readily available and less expensive than cedar or redwood making it a good choice for gardeners who want to keep costs low on a project. But pine typically does not last as long outdoors, especially in constant contact with moisture. That doesn’t mean pine can’t be a good option for a simple, inexpensive garden bed, especially if you’re OK with replacing the boards after a few seasons.
Many gardeners who prefer a more natural approach choose to avoid pressure-treated lumber for edible garden beds. Modern treated wood is considered safer than older versions but some people still feel more comfortable using untreated wood when growing vegetables, herbs or fruits. For flower beds or ornamental gardens, the concern may be less important. But for food gardening, many homeowners would prefer natural wood options.
You will also need some basic fasteners to hold the bed together besides the lumber. Outdoor screws are generally a good choice because they will grip more tightly and are more likely to stay tight over time. You can also use galvanized nails, especially on simpler builds, but screws tend to hold better. You may want to nail in some corner posts or small wooden support blocks inside the bed to help keep the sides aligned and strengthen the frame.
For those not wanting to use wood some gardeners have made simple raised beds of bricks concrete blocks or stones. These materials are sturdy and durable. However, they are more difficult to transport and may be more difficult to install tidily without additional effort. If you’re working on your project with only basic hand tools, wood is the easiest and most beginner friendly choice.
In general, the best material for a simple garden bed is one that will meet your gardening goals, while balancing cost, durability and ease of use. Natural wood is the most pragmatic solution for most beginners. It is easy to work with, readily available and can create a strong, attractive garden bed with just a few simple tools and materials.
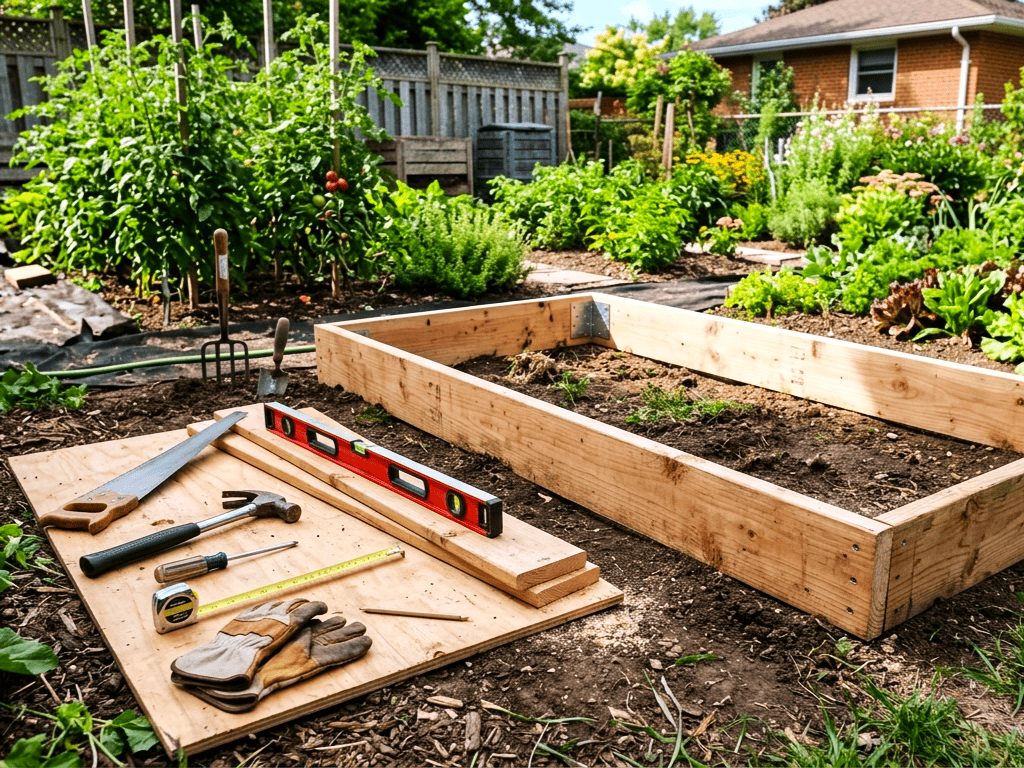
Basic Hand Tools You Will Need
You don’t need a workshop full of tools to build a simple garden bed. In fact, one of the main advantages of this project is that it can be easily completed with a small set of basic hand tools that many homeowners already own. These tools are enough to measure, cut, assemble and position your garden bed without the need for power tools or advanced carpentry skills. Having the right basic tools before you begin will make the process more smooth, safe, and efficient.
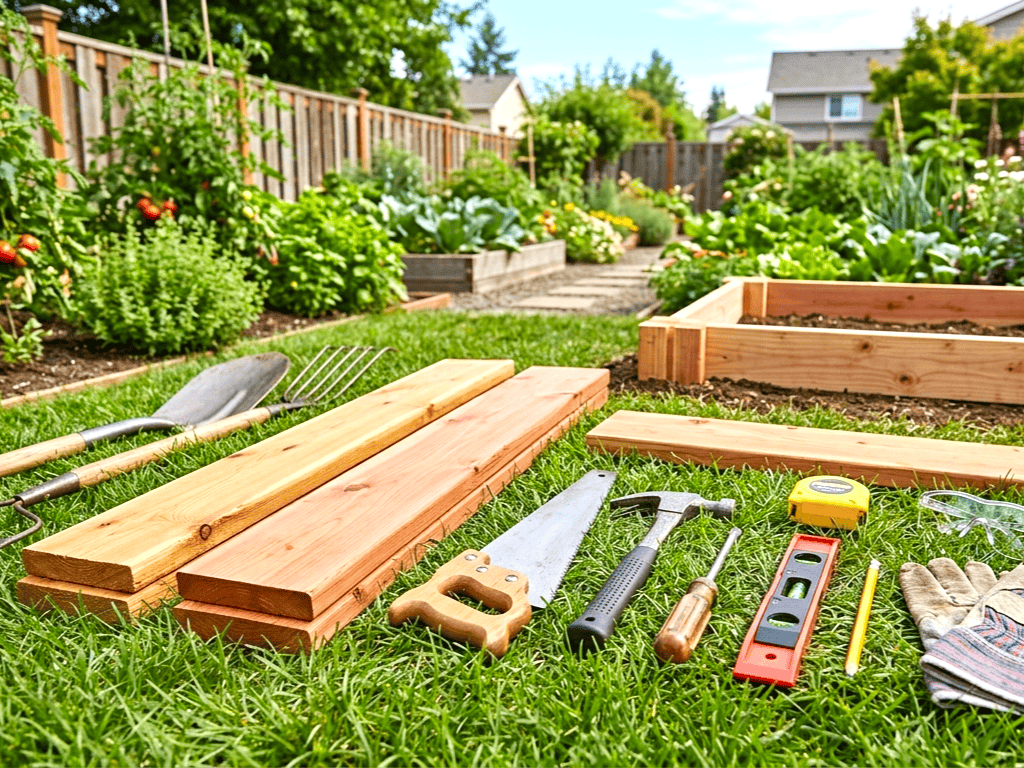
You will need a measuring tape among the most important tools. When building a garden bed, it’s important to take accurate measurements since a small mistake can have an impact on the shape and stability of the frame. You will use the measuring tape to mark the length and width of the bed, measure boards before cutting and check spacing while assembling. A simple tape measure is easy to use and can help to ensure that all parts of the garden bed fit together properly.
Also important is a pencil or marker to mark cut lines and measurements on the wood. Clear markings prevent confusion and enable more precise cuts. You may think this is a small detail but it makes the work so much easier and helps to avoid waste from wrong cuts.
Next you will need a hand saw. This is one of the most important tools for the project because it allows you to cut the boards to the right length. Most standard garden bed lumber can be cut with a simple hand saw, giving you complete control over each cut. It may take more effort than a power saw but it’s cheap, portable and practical for a simple DIY build.
Another important tool is a hammer, especially if you will be using nails in the assembly. It is useful for driving nails into planks, fixing corner supports and making small corrections during construction. You will also need a manual screwdriver , if you want to use screws instead of nails . With a screwdriver you can join boards together tightly, often giving you a more durable and stronger frame than just nails alone. Some gardeners always have a hammer and screwdriver on hand, just in case the project calls for a combination of fasteners.
A level is very handy to make sure the garden bed lies evenly on the ground. If the frame is not level, water may not distribute correctly through the soil and the bed may appear uneven or unstable. A simple spirit level will help you adjust the position before you fill the bed with soil.
You may also need a spade or garden spade for site prep. These tools will come in handy to remove grass, loosen the soil, and level the space for the bed. If the site needs additional cleaning, you can use a garden rake to level the area and remove stones, leaves, or debris.
Other useful items include work gloves to protect your hands and safety glasses to protect your eyes when cutting or hammering. These are fundamental but important safety features.
Generally speaking, the basic hand tools required to construct a garden bed are simple, inexpensive and easy to use. You do not need a lot of specialist equipment to build a sturdy bed ready for planting – a tape measure, pencil, hand saw, hammer, screwdriver, level and a few garden tools will do it.
How to Measure and Mark the Garden Bed Area
Measuring and marking the area for the garden bed is one of the most important steps in the building process. Even if you’re working with basic hand tools and a simple design, taking accurate measurements will make sure the bed fits your space properly, looks smart, and is easier to assemble. A clearly marked layout also helps you to avoid errors that might waste materials, result in uneven sides or make the finished bed harder to maintain.
First, you must decide exactly where the bed will go. Once you’ve found a spot with plenty of sun, good drainage and easy access, you can start laying out the design on the ground. Consider the size of the finished bed and how much space you want to leave around it for walking, watering and harvesting. Unless you incorporate this into your design, keep the bed away from fences, walls or other obstructions. You’ll be much happier with a little extra space around the bed for gardening later.
Start by taking the measurements of the space using a measuring tape. For many easy-to-start garden beds, a rectangle is the easiest shape. A typical size might be 4 feet wide and 8 feet long, but the size should be whatever will fit your yard and your needs. Take the time to measure the space and picture how the bed will fit into the surrounding area. It can be helpful to take a step back and view the layout from many angles before marking it permanently.
Once you are happy with the size, mark out the corners of the bed with wooden stakes, sticks or any temporary garden markers. Drive a stake into each corner of the planned bed. Then, stretch string, twine or garden line between the stakes to outline the edges. This gives you a nice visual and allows you to see the exact footprint of the bed before building it. The string is particularly useful because it makes straight lines and you can easily see if anything is measured uneven.
Once you have the bed outlined double check measurements. Check that the two long sides are the same length and that the two short sides have the same width. It is also useful to measure diagonally from one corner to the opposite corner for rectangular beds and compare that measurement to the diagonal on the other side. If the two diagonal measurements are the same, the layout is square and properly aligned. Otherwise, change the stakes and string until the shape is even. This small step can save you problems down the road when you start working on the frame assembly.
You also have to check the ground in the marked area. Look for slopes, dips, rocks, roots or uneven patches that may affect the placement of the bed. Remove debris with a shovel or rake and smooth as needed. This will allow the garden bed to sit a little more evenly and help stability when it is built.
To further clarify, some gardeners like to mark the ground directly along the string line with spray chalk, sand, or a shovel edge. If you remove the string later, this makes a visible outline. It can be especially useful for preparing the ground, or for moving materials into place.
Make a good start on your garden bed project by carefully measuring and marking out your area. It improves accuracy, makes building easier and helps you to have a neat and well positioned bed that flows naturally into your garden space.
Preparing the Ground Before Building
Never skip the step of preparing the ground before you build your garden bed. A strong, well-made bed frame is one thing, but the success of your garden still depends a lot on what’s underneath it. A well-prepared base helps the bed sit level, improves drainage, eliminates weed problems, and gives plant roots a healthier environment to grow. Taking the time to prep the ground will make the rest of the project easier and help your garden bed perform better over time.
The first step in preparing the ground is to clear the area completely. Clear the area of grass, weeds, rocks, sticks, roots and debris where the bed will be placed. Aggressive weeds can push up through the soil. Unwanted growth left under the bed can cause problems later. You can remove the grass and loosen the top layer of vegetation with a shovel, garden spade or hand fork. If the ground is especially overgrown, a little extra effort, with a clean starting surface, is worth it.
Once the area is clear, check the ground for uneven spots. A garden bed ought to be placed on as level a site as possible, so that the frame stays steady and the soil inside doesn’t slip too much to one side. Rake the ground smooth and free of loose material. Then lay a board across the surface and check the level with a spirit level. If one side is higher, take away some soil from that area. If one side is lower, lightly fill it in and compact it until the ground is more level. You don’t need perfect conditions but the base should be stable and reasonably flat.
Then you have to look at the state of the soil under the bed. Even if you’re planning to fill the frame with fresh garden soil and compost, the native ground underneath still counts. A good idea in many cases is to loosen the soil under the bed with a shovel or garden fork. This lets plant roots grow deeper over time, and helps with drainage. If the soil is compacted, roots may have difficulty moving downward and water may not drain properly. Your garden gets a healthier foundation when the surface layer is broken up.
If weeds are a big worry you may want to add a weed barrier before putting the bed in place or before filling it with soil. Some gardeners use cardboard, a few layers of newspaper, or landscape fabric as a base layer. Cardboard is a popular choice because it’s inexpensive,biodegradable,and helps block weeds as it decomposes over time. If you use cardboard, remove any tape or glossy sections first, and overlap the pieces so weeds have fewer places to slip through. This layer can be laid directly on the prepared ground and under the bed frame.
Drainage should be borne in mind when preparing the ground. Do not place the bed where water stands naturally. If the area is still wet after the rain, you may need to improve the drainage by digging the soil deeper or moving to another area. Generally, raised garden beds help drainage, but water still has to go somewhere under them.
As a rule, ground preparation before building gives a solid base for the whole garden bed. It helps with stability, weed control, drainage and root growth. Give the area a proper clear, level, loosen and protect and you will give your garden bed the best possible start and make the planting process much more successful.
Cutting Wood with Basic Hand Tools
Cutting wood with simple hand tools is a vital step in building a garden bed, and it doesn’t have to be hard. Power saws can speed up the job, but for a small garden project a simple hand saw is often more than enough. For beginners, cutting wood by hand can actually seem more manageable. It gives you more control, a slower pace, and less chance of making hasty mistakes. With proper prep work and careful technique you can make clean, accurate cuts that help your garden bed come together properly.
The first step is to select the proper wood and verify your measurements before cutting. When you’ve determined the final dimensions of your garden bed, use a measuring tape to mark the length of each board carefully. Measure twice, cut once. This old rule is especially important when using hand tools as a bad cut can cost time and materials to fix. Use a pencil or marker to draw a clear cut line across the board so you know precisely where the saw should go.
“If you can use a square or the straight edge of another board to help you make your cut line straight. The straight line is important because uneven ends make it hard to assemble the bed frame. Neater cuts mean tighter joints and a stronger overall structure when the boards meet at the corners. Even if your garden bed is a simple design, care at this stage will improve the final result.
Before you start sawing, put the wood on something steady. A workbench is handy but not always necessary. If necessary, you can also use sawhorses, a sturdy outdoor table, or even balance the board on two stable points. What matters is that the wood should not be wobbly or move about too much when you are cutting. If you have clamps, use them to hold the board. If not, make sure your board is balanced evenly and held firmly.
If you are using a hand saw, take it slow. Make sure you set the saw on the waste side of your cut line so that your final board will be the correct length. Start with short, light strokes to create a guiding groove in the wood. When the groove is established, longer, more even strokes can be employed. Don’t try to force the saw, allow it to do the work. Too much pressure can make the blade wander off line and create rough edges.
Try to keep your arm, wrist and saw in line with the cut as much as possible. Maintain a steady pace and check now and then to make sure you are staying on the marked line. If the cut starts to wander, slow down and ease back your angle. If this is your first time cutting lumber by hand then the quality of your work is more important than the speed of your work.
check the end of the board after each cut. If there are small splinters or rough edges, you can smooth them down with sandpaper or by lightly trimming loose fibers. This makes for easier assembly and a cleaner look for the bed.
In general, cutting wood with simple hand tools is easy, inexpensive and perfectly practical for building a garden bed. With close measurement, good support and patience in sawing, you can make good cuts and prepare all your materials, without any power equipment.
Assembling the Garden Bed Frame Step by Step
This is where your project really starts to take shape – putting together the garden bed frame. Once you have selected your materials, measured and cut the boards to size, you will need to assemble everything into a solid, soil-holding structure that will encourage healthy plant growth. The good news is that a simple garden bed frame is one of the easiest outdoor projects to put together, especially if you are using basic hand tools and a straightforward rectangular design.
First thing to do is lay all your cut boards on the flat ground in the shape of the bed. Most simple garden beds have two longer boards for the sides and two shorter boards for the ends. Put them in place to get the measurements looking correct before fastening anything. This dry layout helps you check that all boards fit together properly and gives you a chance to make adjustments if one piece is slightly uneven or cut incorrectly.
Once the boards are laid out, start building one corner at a time. The easiest way is to overlap the end of one board against the inside face or outside face of another, as per your design. Hold the boards tight and the corner will be a right angle. If you’re working alone, you can use a temporary support block, a brick or something to help support the boards while you attach them.
You can now attach the boards using galvanized screws or outdoor nails. Screws are usually better as they give a better hold and are less likely to come loose over time. If you’re using a manual screwdriver, it’s a good idea to start the screw carefully and keep steady pressure as you turn it. If you are nailing, tap them slowly to start with to keep the boards aligned. Tighten each corner well, then do the next one until you have all four sides done.
Many gardeners add corner posts or blocks of support inside the frame for extra strength. They are short pieces of wood fixed vertically into each corner, giving the boards more surface area to attach to. This gives the bed strength and helps it to hold its shape over time, especially when filled with heavy soil. Corner supports are especially helpful for larger beds or thin lumber.
When the basic frame is assembled, check that it is square and level. Measure the diagonals from corners opposite each other. The frame is square if the measurements are equal. Otherwise, move the frame slowly until the diagonals come closer together. This step is important because an out-of-square frame may not sit properly on the ground and can look uneven once installed.
Then place the assembled frame in its final place and test the sitting on the prepared ground. Use a level to check the sides are even. If the soil under the base is loose or uneven, level it out to prevent any wobbling. You need a good frame before you start adding any liner, weed barrier or soil.
If you have a taller or longer garden bed, you may also want to put in a center support on the sides to prevent it from bowing out once it’s full. It is just one simple extra step that adds durability.
All in all, it’s a do-able task to assemble the garden bed frame in steps when done carefully. Lay out your boards, nailing each corner securely, checking for alignment and reinforcing as necessary, and you will have a strong frame ready for years of productive gardening.
How to Keep the Bed Level and Stable
Keeping the garden bed level and stable is one of the important parts of the building process because it affects the appearance and performance of the finished bed. An unlevel bed can cause soil to shift in one direction or the other, can make watering less effective, and can add unnecessary stress to the frame over time. Even a simple garden bed, built with basic hand tools, should be firmly anchored to the ground so it can support the weight of the soil and plants without leaning, wobbling or settling unevenly.
Step 1 To keep the bed stable and level you need to properly prepare the ground prior to installation. Clear the area where the bed will sit of grass, weeds, rocks, roots and loose debris. Once the space is clean, rake or shovel the surface smooth and remove any obvious high or low spots. You don’t have to put a bed on perfectly engineered ground, but the base should be flat and reasonably firm. Taking more time here will make the rest of the process much easier.
Once the frame is assembled, position it exactly where it will remain. Now using a spirit level check each side of the frame. Set the level along the top edge of one board, then move the level to the next side and around the bed. This tells you if one side is sitting higher or lower than the others. If the frame is a little uneven, small adjustments usually solve the problem. You can take some soil from under a high spot, or add and pack soil under a low spot, so the frame sits more evenly.
It also helps to check for wobble by gently pressing down on the different corners and sides of the bed. Even if the frame rocks or shifts it may not have contact with the ground. In this situation, lift the bed and adjust the base below. Fill low spots with compacted soil, sand, or small amounts of crushed gravel for better support. Don’t use loose material that will settle too much later unless it is firmly packed in place.
Frame strength itself is also a big factor in stability. Ensure that all corners are securely fastened with screws or nails and that the boards are properly aligned. If the corners are loose, it can make the whole structure weaker and more likely to twist or lean over once filled with soil. You can add corner posts or internal support blocks to help the bed keep its form and reinforce it. A center brace along the side walls can help prevent bowing outward under the pressure of the soil for longer beds.
If your yard has a noticeable slope, you might need to do a little extra site prep. In some cases, gardeners take soil from the higher side to level the bed. Some just dig a shallow trench to hold the frame in place more firmly. The idea is to provide even support for the bed, not large gaps under the boards.
In short, you build a level and stable bed by preparing the ground carefully, checking things precisely and assembling solidly. A flat and secure bed will look better, last longer and provide a more reliable growing environment for your plants. One of the best ways to promote long-term gardening success is by providing a stable foundation.
Placing the Garden Bed in Position
Positioning the garden bed is an important step to turn your prepared materials and assembled frame into a working part of your garden. Even if the frame is built, this stage requires care and attention. When the bed is in its final location, it should sit evenly, feel stable, and align properly with the space you planned earlier. A well-placed garden bed will not only look better, but will make planting, watering and long-term maintenance much easier.
Before positioning the frame, ensure that the ground has been cleared, leveled, and checked for debris. The bed may not sit flat due to grass, stones, roots and uneven spots. If the base isn’t properly prepared, the frame can wobble, lean or leave gaps underneath. These problems can be more apparent once the bed is filled with soil, so it is much easier to correct them before final placement.
If you have a light, small garden bed frame, you may be able to pick it up and walk it into place yourself. For bigger beds it is usually easier and safer to ask for help. Carry the frame carefully so that you don’t loosen the corners or twist the boards. Do not drag the frame along the ground, especially if the surface is uneven, as this can weaken the joints or put the frame out of square.
When the bed is roughly in position, line it up with the marks you made earlier. If you marked out the bed with stakes and string, be sure that the frame is very close to those lines. Take a few steps back and look at the bed from different angles. “Make sure it is in the place where you want it and has enough room around it for walking, watering and harvesting. Best time to make small adjustments to its position before putting anything inside.
Put the frame in and check again that it’s level. Put a spirit level on the top edges and check all sides. If one side is higher or lower than the rest, lift the frame a little and level the earth underneath. Some extra work now will prevent uneven soil levels and bad water distribution later. Check the frame for movement by gently pressing on the corners and sides. If it sways or rocks, the base may require additional leveling or support.
Some gardeners like to make the bed a bit more stable, particularly in windy areas or on slightly uneven ground. A simple fix is to drive short wooden stakes into the ground at the inside corners of the frame. These stakes can help keep the bed from shifting over time and provide additional support for the boards. This step is not always needed for small beds but can improve long term stability.
You should also consider orientation when placing the bed. Many gardens have longer beds in a location that is exposed to even sunlight all day. The exact direction will depend on your yard, but the aim is to avoid unwanted shade from fences, walls or nearby trees.
In general, setting the garden bed in place is more than just placing it on the ground. It’s about getting the bed level, flat, solid and ready for the next step. A well-placed garden bed helps to provide a stronger foundation for healthy plants and makes the entire garden space feel more organized and functional.
Adding a Weed Barrier or Base Layer
Adding a weed barrier or base layer is an important step in the building of a garden bed as it creates a cleaner, healthier, and easier to maintain growing space. Not all gardeners like to do this, but by putting a simple barrier at the bottom of the bed you can reduce the amount of weeds that grow, help separate the soil and make the bed more effective in the long run. A good base layer can save you work later by reducing the number of weeds that sprout into your planting area and give your garden a more controlled start.
The main function of a weed barrier is to keep unwanted plants from growing up through the soil in your new garden bed. Even if you’ve done a good job clearing the area, there can be roots from grass and weeds and hidden seeds in the ground. Once the bed is filled with rich soil and compost, those weeds may take advantage of the improved growing conditions and start pushing upward. So a weed barrier will help slow down or prevent that process, giving your plants a better chance to grow without competition.
Cardboard is one of the most popular and practical base layer materials. Plain brown cardboard is also cheap and easy to work with, and readily available. It works well because it blocks sunlight from reaching weeds below, which weakens them over time. Cardboard will not permanently separate your garden bed from the soil below, as it will break down naturally. As it breaks down roots can slowly work their way into it and into the native ground. This can be helpful for deeper root growth. Before you use cardboard, strip off all tape, stickers, glossy coatings or heavy printing. Then lay the pieces flat across the bottom space of the bed, overlapping the pieces a little so weeds have less space to grow through.
Another choice is Base Layer Newspaper. A few layers of plain newspaper also work well to prevent weeds. Newspaper is biodegradable and is often used by gardeners that want to use biodegradable materials. Newspaper breaks down over time just like cardboard. It is, however, thinner than cardboard and so may not last as long or keep out aggressive weeds quite as effectively.
Others use landscape fabric instead. This is stouter, possibly more durable, than cardboard or newspaper, but it has its disadvantages, too. Sometimes, landscape fabric inhibits the natural movement of roots and soil organisms. It may also become less effective over time with the accumulation of soil and organic matter on top of it and the eventual growth of weeds anyway. Many gardeners like cardboard for simple garden beds because it is inexpensive, natural and easy to install.
To incorporate the barrier, place it on the prepared ground before you fill the bed with soil. Ensure the whole bottom area is covered including the corners and edges. Once it’s all set you can start adding your soil mix to the top. The weight of the soil will help keep the barrier in place.
In the end, adding a weed barrier or base layer is an easy but important step when creating a garden bed. It helps reduce weeds, makes a tidier planting area and gives your new bed a better start. You can add a material (cardboard, newspaper) to improve the long term performance of the bed without adding much cost or difficulty to the project.
Filling the Bed with Soil and Compost
One of the most exciting parts of the whole project is filling the garden bed with soil and compost, transforming an empty frame into a productive growing space. This is the step that prepares the bed for planting after all the measuring, cutting, assembling and positioning. The materials you introduce at this point will directly affect plant health, root growth, drainage and the long term performance of your garden, so it is worth taking care.
The first thing to understand is that soil is not all the same thing. Don’t just dump some heavy yard dirt from elsewhere on the property into a garden bed. Native soil may be compacted, low in nutrients, full of weed seeds, or poorly drained. Instead, the idea is to create a loose, rich, well-balanced growing mix that gives roots plenty of air, moisture and nutrients. A good garden bed soil mix will hold water but not be soggy. It will drain well but not dry out too fast.
The easiest way for most home gardeners is to blend good quality topsoil with compost. Topsoil adds bulk and structure, and compost contributes organic matter and nutrients that enhance soil health. The usual way is to mix the two materials rather than layer them. Mixing creates a more uniform growing environment and encourages the roots to spread more naturally through the bed. Compost is also good for the beneficial life of the soil and can over time increase fertility and plant growth.
If you’re planning to add a weed barrier or base layer, make sure to lay it down before you start filling the bed. Once that is ready, start adding the soil mix slowly. Don’t throw everything in one corner if you can help it. Fill by spreading the materials as evenly as possible across the bed. So the frame does not load up unevenly and the soil gets levelled easier. The soil mix can be shifted and spread with a shovel, garden fork or rake.
Turn the bed over as it fills, removing stones, roots and debris that may have been mixed into the soil. It is important to have a loose texture because compacted material can hinder the movement of water and roots in the bed. If you are mixing separate bags or piles of topsoil and compost, mix them as you go to ensure the end result is consistent throughout the bed.
It is also important not to overfill the frame. At the top, leave some room between the edge of the bed and the top of the soil. Often an inch or two of space is helpful to allow for easier watering and to avoid soil spilling over the sides. Filling the bed to the top can cause water to run off faster rather than soaking in properly.
Once the bed is full, level the surface with a rake or the back of a shovel. This creates a nice level planting area and helps you see any low spots that may need a little more soil. A light watering of the bed after filling will also help settle the mix. If the level of soil has dropped after watering, add a little more to bring it back to the desired height.
Filling the bed with soil and compost is more than just adding material overall. It’s about laying the right foundation for healthy plant growth. This will give your garden bed a good blend of soil that holds moisture, provides nutrients, and helps establish strong roots from the get-go.
Best Soil Mix for Raised Garden Beds
The right soil mix for a raised garden bed is an important choice because it will be the main growing environment for your plants. In a raised bed, the quality of the material you put into the bed is important, as opposed to traditional in-ground gardening where the roots go into the native soil below. A good soil mix will help roots grow strong, hold the right amount of moisture, drain excess water and give plants the nutrients they need to grow strong and productive. You will not get good results from even the best built garden bed if your soil mix is poor.
The best soil mix for a raised garden bed is loose, rich and well balanced. It should feel soft and crumbly, not hard, sticky, or packed down. The soil could be too dense and prevent roots from spreading, water could pool in areas where it shouldn’t, and airflow around roots could be restricted. If the mix is too light or sandy, on the other hand, it may drain too quickly and leave plants dry. The best raised bed soil strikes a balance between structure, moisture retention and drainage.
There is a very common and effective mix for raised beds. It has three main components: topsoil, compost, and an aerating substance. Topsoil is the basis and gives the bed volume and stability. It helps to anchor roots and is the main structure of the soil. Compost adds organic matter, nutrients and beneficial microbes. This improves fertility, makes the soil retain moisture but still be workable. The third ingredient is usually something like coarse sand, coconut coir or another light organic material that helps with texture and prevents the mix from becoming too compacted.
Most gardeners use a simple formula such as equal parts topsoil, compost and an aerating ingredient. This kind of mix is good for many vegetables, herbs and flowers as it allows roots access to water and nutrients without making the bed heavy or poorly drained. When buying bagged materials, choose products labeled for garden beds, vegetable gardens or raised bed planting. They are often formulated to provide a well-balanced growing medium.
Compost is one of the essential ingredients in the mix. It enhances almost every soil function such as fertility, texture and moisture balance. Well-made compost also draws in good creatures in the soil that will help to break down organic material and encourage healthy plant growth. If you’re using homemade compost or store-bought compost, it should be dark, crumbly, and earthy smelling and not wet, sour, or unfinished.
You want to avoid using nothing but pure topsoil or heavy clay-based soil in raised beds. These materials can compact too easily and may not provide enough drainage or organic matter. You should also avoid using soil from an unknown source that might contain weed seeds, pests or contaminants.
Most crops in raised beds will do well in a rich, loose mix with plenty of compost, but different plants may have slightly different soil preferences. As the plants grow, the soil will settle and the nutrients will be used, so a good idea is to refresh the bed regularly and add more compost each season.
Best Soil for Raised Garden Beds Overall, the best soil mix for raised garden beds is a soil that offers structure, nutrition, and airflow. The combination of top soil, compost and a texture-enhancing material creates a strong foundation for your plants to thrive. Right soil will make your raised bed much more productive and much easier to manage through the growing season.
What to Plant in Your New Garden Bed
Once your new garden bed is built, filled, and ready for use, the next exciting step is deciding what to plant in it. This part of the process is Then comes the fun part. After you have built, filled and prepared your new garden bed for use, you get to decide what to plant in it. Here is where the project really becomes a garden. The best plants for a new garden bed depend on your climate, available sunlight, soil quality and your personal goals. Some gardeners want fresh vegetables for the kitchen, others are after herbs, flowers or a mixture of all three. Whatever you choose, a prepared garden bed is a good home for a lot of different plants.
For a novice, it is usually best to start with easy, dependable crops that grow well in raised or framed beds. Leafy greens are at the very top. Lettuce, spinach, arugula, and kale are typically fast-growing, don’t need a lot of space, and can be harvested over time. These are particularly valuable crops, as they help new gardeners see results in a fairly short time, which builds confidence and keeps the gardening experience fun.
Herbs are another good choice for a new garden bed. Basil, parsley, cilantro, mint, chives and thyme can all do well in the right location with enough sunlight if you prepare the bed properly. Herbs are useful because they don’t always need large planting areas and are good for everyday cooking. Many herbs are attractive as well, so it is a good choice if you want your garden bed to be productive and attractive.
If you want to grow vegetables, there are several good choices for beginners that are well suited to a new bed. Radishes, carrots, beets, bush beans and green onions are often grown in raised beds because they will benefit from the loose soil structure. Carrots and beets especially thrive in soft, stoneless soil that allows them to develop properly. Tomatoes, peppers and cucumbers can also do very well but they often require more support, more space and a longer growing season. If you’re a gardener who wants to keep things simple to start with, starting with smaller and faster crops might be a smarter approach.
You can also add flowers to a new garden bed. Marigolds, zinnias, calendula and nasturtiums are known for being colorful, easy to grow and attracting pollinators. A flower bed can add color to the area and help support bees and butterflies, which can be of benefit to nearby vegetables and herbs. Some gardeners even mix flowers with edible plants to make a bed which is useful as well as attractive.
Consider the size of the bed and the mature size of each plant when deciding what to plant. Leave room for growth, especially when planting in a new bed. Plants require enough space for air flow , root growth and sunlight . It’s also good to group plants with similar needs together so watering and care are easier.
Your new garden bed can support many types of plants overall, but starting simple often produces the best results. You could start with easy greens, herbs, root vegetables, and a few flowers. Selecting plants that are suited to your space, climate, and experience level can help make your new garden bed a healthy, productive, and rewarding part of your outdoor space.
Common Mistakes to Avoid When Building Garden Beds by Hand
Hand-building a garden bed is a practical and rewarding project, but like any DIY task, it can go smoother when you know what mistakes to avoid. Many problems are not due to a lack of effort. These tend to happen because small details are overlooked in the planning, measuring or assembly process. The good news is that most of these mistakes are easily avoided with a little patience and careful preparation. Knowing the most common mistakes will help you build a more durable, longer-lasting, and better suited garden bed for healthy plant growth.
One of the most frequent mistakes is selecting the wrong location. A garden bed may look nice in one part of the yard, but if that part doesn’t get enough sun or has poor drainage, the plants may not do well. Many vegetables, herbs and flowers need several hours of direct sun each day. A bed in heavy shade or a low spot where water collects can result in weak growth, soggy soil, and ongoing maintenance problems. One of the best ways to prevent future frustration is to take time to study sunlight and drainage before building.
Another common mistake is making the bed too wide. At first, a large bed may seem like a good idea, but if you can’t easily reach the center of it without stepping into it, it’s hard to weed, plant, and harvest. Getting into the bed can compact the soil and damage the roots of plants. Most home gardeners find it easier to work from either side of the bed if it is between 3 and 4 feet wide.
Poor measuring and inaccurate cuts are also common problems when building by hand. If the boards are not cut evenly or the measurements are rushed, the frame may not fit together properly. This can lead to weak corners, out-of-square shape, or gaps between boards. Measuring carefully, marking clearly, and checking each cut before sawing will save a lot of unnecessary trouble later.
Another common mistake is not leveling the ground before putting the frame down. A well-built bed can still be unstable if it’s sitting on uneven soil. An unlevel bed can be tilted, shaken or have water collect on one side more than the other. Before installation, clear and smooth the site and check it with a level to make sure the frame will sit securely.
Some gardeners also use the wrong materials. Thin boards, cheap fasteners or the wrong wood can shorten the life of the bed. Cheap materials may save you money short term but can warp, come loose or rot over time. Use sturdy wood and outdoor-friendly screws or nails that can withstand moisture and soil pressure.
Another common mistake is using poor soil fill. A garden bed is only as good as the dirt in it. Bad fill material, such as packed dirt or material full of weeds, can limit plant growth and cause continuing problems. A good mix of topsoil and compost will usually give a much better result.
The biggest mistake is rushing the process in the end. It is best to build a garden bed by hand, one step at a time. You can have a durable and productive garden bed, just by avoiding bad placement, bad measurements, weak materials, uneven ground and low quality soil.
Tips to Make Your Garden Bed Last Longer
A good garden bed can last you many growing seasons, but its life span is more than just its original build. Weather, moisture, soil pressure, and normal wear and tear over time affect the strength and beauty of the bed. The good news is, with a few smart choices and simple maintenance habits, you can greatly extend the life of your garden bed. Whether you grow vegetables, herbs or flowers a durable garden bed is a time saver, replacement cost saver and keeps your garden looking neat and productive .
One of the best ways to extend the life of a garden bed is to start with the right materials. For outdoor use, some of the most durable options are naturally rot resistant woods such as cedar and redwood. They handle moisture better than many softer woods and do not decay as fast. If you select a less expensive wood, such as pine, you can still get a good result but it may require more maintenance and not last as many years. Regardless of the wood you select, choosing boards that are thick enough and free of major cracks or damage will make the bed more durable.
Correct placement also helps in increasing the life of the bed. Garden beds located in an area with standing water are more prone to rot, shift or weaken over time. That is why drainage is so important. Constructing the bed on a level, well prepared surface will allow the water to drain more naturally and prevent stress on the frame. A good way to have the bed stable is to prevent twisting, leaning or settling from the start.
Another simple but important step is to use strong fasteners. Basic nails are fine , but often outdoor screws work better because they hold the boards together more securely over time . You have to remember that soil inside the bed pushes out on the sides, especially after watering or a heavy rain, so tight corners and strong joints are very important.” Adding internal corner supports or braces will also make the frame more stable and will help reduce the chance of boards pulling apart.
Moisture is a major cause of wear and tear so taking action to control it can make a big difference. Don’t leave your plants in constantly wet soil by overwatering them. Wet soil means more stress on the frame and a higher chance of wood rot. Watering regularly is good for both plants and structure. Some gardeners also line the inside of the bed walls with landscape fabric or other breathable barrier to help reduce the contact between moist soil and the wood. This can help protect the boards and still let water drain.
Seasonal maintenance is also very important. Inspect the garden bed often for signs of damage like loose screws, cracked boards, soft spots or shifting corners. Small problems are easier to catch early and can prevent bigger breakdowns later on. At the end of each season, remove heavy plant debris and inspect the bed before the next planting cycle.
You also don’t want to add extra weight to the edges of the bed. Heavy tools resting, standing or leaning against the sides can weaken the structure over time. A garden bed is not designed to carry weight from above.
Extending the life of your garden bed is, for the most part, a matter of material choice, sturdy construction, moisture control, and routine care. With the right habits, a simple bed made with basic hand tools can stay strong, functional and attractive for many years.
Easy Maintenance After Installation
Once you’ve built and planted your garden bed, the secret to keeping it productive, attractive and long-lasting is regular maintenance. The good news is that a well made garden bed is generally easier to maintain than an old fashioned in ground garden. The defined structure, improved soil and organized layout helps in many routine tasks to be managed easily. But even a basic garden bed needs regular attention if you want healthy plants and good long-term results.
Watering is one of the most important chores of maintenance. One big benefit of raised or framed garden beds is that they often drain better than ground-level planting areas, but that also means they can dry out more quickly in warm weather. Check the top inch or two of soil by touching it with your hand regularly. If it feels dry it normally needs a drink. The aim is to maintain the soil moist but not waterlogged. It is usually better to water plants deeply but infrequently rather than shallowly and often as this encourages the roots to grow deeper and stronger. You may need to water more often during hot or windy periods.
Weeding is another simple, but important part of maintenance. Some weeds will always appear, even if you have used a weed barrier or prepared the ground carefully. Get rid of them early when they are still small. This prevents them competing with your plants for water, sunlight and nutrients. Weeds are easier to pull out of loose soil than compacted ground, and garden beds often have loose soil. A few minutes spent weeding regularly can save a lot of work later on.
Soil care is important after installation too Garden beds settle naturally over time and plants use up nutrients. Add compost or organic matter regularly between planting seasons to keep the bed healthy. Adding another layer of compost improves soil structure, replenishes nutrients and encourages beneficial organisms. If the soil level drops a lot, add more soil to keep the bed full enough for good root growth and watering.
Mulching is another easy maintenance step that offers many benefits. Mulch such as straw, shredded leaves or untreated wood chips helps retain soil moisture, reduce weed growth and protect the soil surface from erosion. Mulch also helps to control soil temperature, which is beneficial in hot or cool weather. Just make sure you don’t build up too much mulch around the stems of plants, as this can cause moister problems.
Besides it is a good idea to check the frame of the garden bed from time to time. Look for loose screws, cracked boards, shifting corners or signs of rot. The earlier you catch these issues, the easier the repairs, and it could even help extend the life of the bed. But when one board is weak, it’s better to replace or shore it up before it fails and creates bigger issues down the road.
Care of plants is another part of the overall maintenance. Remove dead leaves, harvest crops regularly, and prune plants as needed to improve airflow and reduce disease risk. Watch for pests or signs of poor plant health so that problems can be addressed early.
In summary, easy maintenance after installation comes down to a few consistent habits: water properly, remove weeds, feed the soil, use mulch, check the frame and care for the plants. Regular attention will keep your garden bed healthy, productive and fun year after year.
Budget-Friendly Ideas for DIY Garden Beds
It doesn’t take a lot of money to make a garden bed. In fact, one of the best things about a DIY garden bed project is that it can be adapted to fit just about any budget. With a bit of planning, some smart material choices, and an easy design, you can create a functional and attractive garden bed without breaking the bank. This is especially useful for beginners, renters, or anyone who wants to get into gardening in a practical and affordable way.
The simplest way to save costs is to keep the design simple. A simple rectangular garden bed is usually the most economical choice since it requires fewer cuts, less wasted material and less time to build. Straight boards are easier to measure, cut and assemble with basic hand tools, so you don’t need expensive supplies or advanced equipment. A simple shape also makes it easier to work out how much wood and soil you will need, so you don’t overspend.
Choosing cheap materials is another great way to reduce costs. Cedar and redwood are both attractive and durable, but they can be costly. Pine is often a cheaper alternative for budget-conscious gardeners. It may not last as long, but it can still work well for a few seasons, especially if the bed is well maintained. Others use reclaimed wood from old pallets, fencing or leftover building materials but make sure the wood is clean, safe and free of any harmful chemicals before using it in a garden.
Cheap options are concrete blocks , bricks or stones if you can get them second-hand or you already have access to them . These materials are strong and durable, and can be arranged into a simple raised bed with little cutting or fastening. But they are heavier to move and can take more effort to arrange neatly. Reclaimed wood is still the easiest budget option for many people.
Another clever way to save money is to start with a smaller bed. A common mistake among new gardeners is to build a large bed from the start, only to find that it requires more soil, more plants and more upkeep than they had anticipated. Starting small, with one bed, is a good idea to keep costs down and gain experience. You can always build later when you know what works in your space.
Soil can also be a big part of the budget, especially for deeper beds, so it helps to fill the bed wisely. Instead of using expensive bagged garden soil, many gardeners mix in some topsoil with compost to reduce the cost while still giving a healthy growing environment. Some also put coarse organic material such as small branches, leaves or untreated pieces of wood on the bottom of taller beds to reduce the amount of soil needed on top.
You can also save money by using supplies and tools you already have. Simple items like a hammer, tape measure, screwdriver, shovel and hand saw can usually get the job done. No need to buy any special tools for a simple build.
To sum up, cheap DIY garden beds are all about smart choices. Simple designs, inexpensive or salvaged materials, reasonably sized beds, and low-cost soil strategies can allow you to create a productive garden space without breaking the bank. A low-cost garden bed can be strong, useful and rewarding for many growing seasons.
Final Thoughts
Building a garden bed with simple hand tools is a straightforward and fulfilling project for anyone to tackle. You don’t need fancy carpentry skills, expensive power tools or a big budget to build a useful growing space. Proper planning, the right materials and a step-by-step method can create a strong and durable garden bed that encourages healthy plants and makes gardening easier.
This project is especially good for beginners because it shows that starting a garden doesn’t have to be an overwhelming experience. You can do a lot with simple tools and consistent effort, stick to the basics, choose a good location, measure carefully, prepare the ground, assemble the frame correctly, and fill the bed with good soil. Each step in the process builds confidence and allows you to better understand your garden space.
Benefits of a garden bed made by hand in the long term It gives you a neat, tidy place to plant, helps with soil control and can make watering, weeding and harvesting more convenient. Vegetables, herbs, flowers or a mix of all three, the end result is more than a structure. And that is the beginning of a productive and enjoyable garden.
In the end, building by hand isn’t just about saving money or avoiding power tools. It is about building something useful with your own hands and feeling the satisfaction that comes from it. A good garden bed can last you for years, and give you a good start for many successful growing seasons to come.