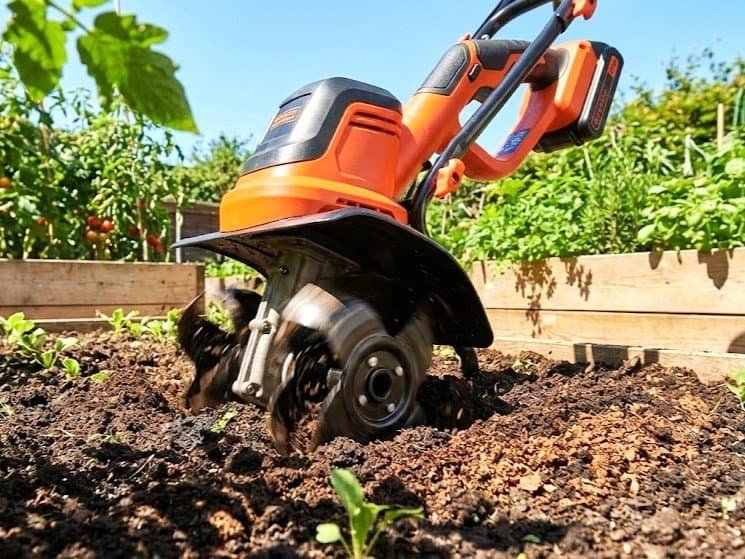
An electric tiller is a practical garden tool designed to make soil preparation faster, easier, and more efficient. It works by using an electric motor to power rotating tines that dig into the soil, breaking it apart and loosening compacted ground. As the tines spin, they turn over the soil, improving aeration and creating a softer texture that allows plant roots to grow more freely. This process also helps mix organic matter, such as compost or fertilizer, evenly into the soil, improving overall soil quality.
Electric tillers are especially effective for small to medium-sized gardens, raised beds, and home landscaping projects. Unlike manual digging, an electric tiller provides consistent results with less physical effort and better control. By preparing the soil properly before planting, an electric tiller helps create a healthier growing environment, improves water absorption, and promotes stronger, more productive plants.
What Is an Electric Tiller?
An electric tiller is a powered gardening tool designed to loosen, turn, and prepare soil for planting using an electric motor. It operates by driving a set of rotating metal blades, known as tines, into the ground to break up compacted soil and create a smooth, workable surface. Electric tillers are commonly used in home gardens, raised beds, flower plots, and small landscaping projects where precision and ease of use are more important than heavy-duty power.
The basic purpose of an electric tiller is to improve soil structure before planting. Breaking up hard soil, it allows air, water, and nutrients to penetrate more easily to plant roots. Electric tillers also help mix compost, manure, or fertilizer evenly into the soil, ensuring better nutrient distribution. Compared to manual digging with a shovel or hoe, an electric tiller saves time, reduces physical strain, and delivers more consistent results. Because they run on electricity, these tillers are quieter, lighter, and more environmentally friendly than gas-powered alternatives, making them ideal for residential use.
Difference Between a Tiller and a Cultivator
Although the terms tiller and cultivator are often used interchangeably, they serve different purposes in gardening.
A tiller is designed for initial soil preparation. It is used at the beginning of the gardening season to break new ground or loosen soil that has become compacted over time. Tillers typically have stronger motors and larger tines that can dig deeper into the soil, making them suitable for turning soil and preparing planting beds from scratch.
A cultivator, on the other hand, is used for soil maintenance rather than heavy soil breaking. It is ideal for shallow soil work, such as removing weeds, loosening the topsoil between rows of plants, and improving aeration during the growing season. Cultivators are generally smaller, lighter, and less powerful than tillers, offering better control around established plants.
In simple terms, use a tiller to prepare the soil before planting, and use a cultivator to maintain the soil after plants have started growing. Understanding this difference helps gardeners choose the right tool for their specific needs and achieve better results with less effort.
Main Components of an Electric Tiller
An electric tiller is made up of several key components that work together to prepare soil efficiently and safely. Understanding these main parts helps users operate the tool correctly, maintain it properly, and choose the right model for their gardening needs. The three most important components of an electric tiller are the electric motor, the tines (blades), and the shaft and gearbox.
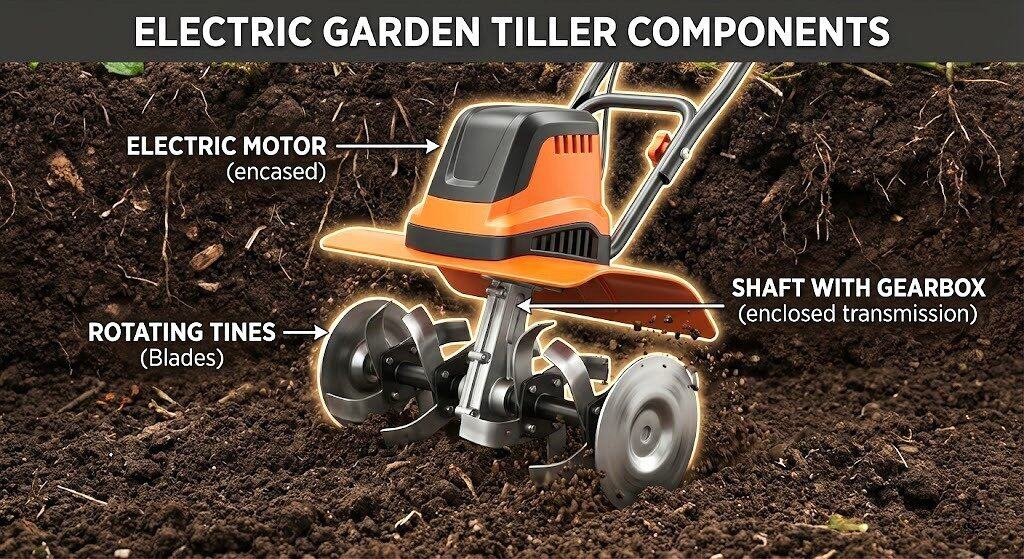
Electric Motor
The electric motor is the heart of an electric tiller. It converts electrical energy from a power source—either a corded outlet or a rechargeable battery—into mechanical power. This power drives the rotating tines that dig into the soil. Electric motors are valued for their quiet operation, low maintenance requirements, and instant start compared to gas engines. They also produce zero direct emissions, making them environmentally friendly and suitable for residential areas. Motor power is typically measured in amps or watts, and higher power levels allow the tiller to handle tougher soil conditions more effectively.
Tines (Blades)
Tines, also known as blades, are the metal components that come into direct contact with the soil. They rotate rapidly to break up compacted ground, loosen soil structure, and mix organic materials such as compost or fertilizer. Tines are usually made from hardened steel to withstand repeated impact with soil and small debris. Their shape, size, and number affect how deeply and efficiently the tiller works. Wider and curved tines provide better soil penetration, while smaller tines offer greater control for delicate garden beds. Proper tine design ensures even soil texture and improved aeration.
Shaft and Gearbox
The shaft and gearbox form the mechanical link between the motor and the tines. The shaft transfers rotational power from the motor to the gearbox, which then adjusts the speed and torque before delivering it to the tines. The gearbox is essential for controlling tine rotation, ensuring smooth operation, and preventing damage to the motor. A well-designed gearbox allows the tiller to handle resistance from hard or compacted soil while maintaining consistent performance. Together, the shaft and gearbox provide stability, durability, and efficient power transmission.
In combination, these components allow an electric tiller to perform reliable, effective soil preparation with minimal effort and maximum control.
How an Electric Tiller Works (Step-by-Step)
An electric tiller operates through a simple but effective process that transforms hard, compacted ground into loose, fertile soil ready for planting. Understanding how it works step by step helps gardeners use the tool more efficiently and achieve better soil preparation results.
Power Supply (Corded vs Cordless)
The process begins with the power supply. Corded electric tillers draw electricity directly from a household power outlet, providing consistent power for continuous operation. They are ideal for small to medium gardens where an extension cord can easily reach. Cordless electric tillers, on the other hand, rely on rechargeable batteries. While they offer greater mobility and freedom of movement, their operating time is limited by battery capacity. Both options deliver instant power with minimal noise and no fuel requirements.
Motor Rotation Mechanism
Once powered on, electricity flows to the electric motor, which converts electrical energy into rotational mechanical energy. The motor spins a drive shaft connected to the gearbox. The gearbox regulates speed and increases torque, allowing the tiller to work effectively even when encountering resistance from compacted soil. This controlled rotation ensures smooth and stable operation while protecting the motor from overload.
How Tines Break and Loosen Soil
As rotational force reaches the tines, they begin spinning rapidly. These hardened metal blades dig into the soil, cutting, lifting, and breaking it apart. The repeated motion fractures compacted layers and reduces large soil clumps into finer particles. This action loosens the ground, making it easier for roots to penetrate and expand. The depth and effectiveness of this process depend on tine design, motor power, and soil condition.
Soil Mixing and Aeration Process
While breaking the soil, the rotating tines also mix organic materials such as compost, manure, or fertilizer evenly throughout the soil. This mixing improves nutrient distribution and enhances soil structure. At the same time, tilling creates small air pockets within the soil, improving aeration. Better aeration allows oxygen, water, and nutrients to reach plant roots more efficiently, promoting healthier plant growth.
Through these coordinated steps, an electric tiller simplifies soil preparation, saving time and effort while creating optimal growing conditions for gardens and landscaping projects.
Soil Preparation Process Using an Electric Tiller
Proper soil preparation is essential for healthy plant growth, and an electric tiller plays a key role in making this process efficient and effective. By loosening the soil, blending nutrients, and improving airflow, an electric tiller helps create an ideal growing environment for gardens, raised beds, and small landscaping areas.
Breaking Compacted Soil
One of the primary functions of an electric tiller is breaking compacted soil. Over time, soil can become hard and dense due to foot traffic, rainfall, or previous cultivation. Compacted soil restricts root growth and prevents water and nutrients from reaching plants effectively. When an electric tiller is used, its rotating tines dig into the ground and fracture these dense layers. This action breaks large clumps of soil into smaller, manageable particles, making the soil softer and easier to work with. Loosened soil allows plant roots to spread more freely and establish stronger root systems.
Mixing Compost and Organic Matter
An electric tiller is also highly effective at mixing compost and organic matter into the soil. Adding compost, aged manure, or other organic materials improves soil fertility and structure. As the tiller’s tines rotate, they blend these materials evenly throughout the soil instead of leaving them concentrated on the surface. This ensures nutrients are distributed uniformly, promoting consistent plant growth across the entire garden bed. Proper mixing also enhances the soil’s ability to retain moisture while improving drainage, creating a balanced growing medium suitable for various types of plants.
Improving Soil Aeration
Another major benefit of using an electric tiller is improved soil aeration. As the soil is turned and loosened, air pockets form within the soil structure. These pockets allow oxygen to reach plant roots, which is essential for root respiration and overall plant health. Improved aeration also supports beneficial soil microorganisms that help break down organic matter and release nutrients. Additionally, well-aerated soil absorbs water more efficiently, reducing runoff and preventing waterlogging.
By breaking compacted soil, mixing organic matter, and improving aeration, an electric tiller transforms poor-quality ground into fertile, well-structured soil. This preparation process sets the foundation for stronger plants, better nutrient uptake, and higher yields throughout the growing season.
Types of Soil Suitable for Electric Tillers
Electric tillers are versatile garden tools, but their performance depends greatly on the type of soil being worked. Understanding which soils are most suitable—and how to handle more challenging conditions—helps gardeners achieve better results while protecting their equipment.
Loamy Soil
Loamy soil is the most suitable and ideal type of soil for electric tillers. It is a balanced mixture of sand, silt, and clay, offering good structure, proper drainage, and excellent nutrient retention. Because loamy soil is naturally loose and crumbly, an electric tiller can easily break it up and turn it evenly. The tines move smoothly through the soil, creating a fine texture without excessive resistance. Tilling loamy soil also allows compost and organic matter to mix efficiently, further improving fertility. For home gardens and raised beds, loamy soil delivers the best results with minimal effort and reduced strain on the tiller’s motor.
Sandy Soil
Sandy soil is another type that works well with electric tillers. It consists of larger soil particles that allow water to drain quickly. While sandy soil is easy to till due to its loose nature, it often lacks nutrients and organic matter. Using an electric tiller in sandy soil helps blend compost, mulch, or organic fertilizers into the ground, improving moisture retention and soil fertility. Gardeners should avoid over-tilling sandy soil, as excessive tilling can further reduce its ability to hold nutrients. Light, controlled passes with the tiller are usually sufficient.
Clay Soil (Limitations & Tips)
Clay soil presents the biggest challenge for electric tillers. It is dense, heavy, and prone to compaction, which can strain smaller electric motors. Tilling clay soil when it is wet can cause it to clump and harden further, reducing effectiveness. For best results, clay soil should be tilled only when it is slightly moist but not wet. Making multiple shallow passes instead of one deep pass reduces stress on the tiller. Adding organic matter, such as compost, before and after tilling helps break down clay particles and improve soil structure over time.
In summary, electric tillers perform best in loamy and sandy soils, while clay soil requires careful technique and patience. Understanding soil type ensures efficient tilling, better soil health, and longer equipment life.
Tilling Depth and Coverage
Tilling depth and coverage play a crucial role in effective soil preparation. Using the correct depth ensures that soil is loosened enough to support healthy root development without damaging soil structure or beneficial microorganisms. Electric tillers are designed primarily for shallow to medium-depth tilling, making them ideal for home gardens, raised beds, and flower plots.
Average Tilling Depth
The average tilling depth of most electric tillers ranges between 6 to 8 inches (15–20 cm). This depth is sufficient for loosening topsoil, breaking up compacted layers, and preparing the ground for planting. Some smaller or lightweight models may till slightly shallower, around 4 to 6 inches, which is still effective for surface soil preparation and soil maintenance. Unlike heavy-duty gas tillers, electric tillers are not intended for deep ground breaking but excel at creating a fine, workable soil layer for planting.
How Tine Size Affects Soil Depth
Tine size and design directly influence how deep an electric tiller can work. Longer and wider tines are capable of penetrating deeper into the soil, increasing both depth and coverage. Curved or angled tines dig more aggressively, allowing the tiller to break through moderately compacted soil. Smaller or shorter tines provide better control and are ideal for shallow tilling in delicate areas such as raised beds or around existing plants. The number of tines also affects coverage width, with more tines covering a wider area in fewer passes. Choosing the right tine size helps balance depth, control, and motor efficiency.
Best Depth for Vegetables and Flowers
The best tilling depth depends on what you plan to grow. Most vegetables, including tomatoes, peppers, lettuce, and beans, thrive when soil is tilled to a depth of 6 to 8 inches, allowing roots to spread easily and access nutrients. Root vegetables such as carrots or radishes may benefit from slightly deeper, well-loosened soil to encourage straight root growth. For flowers and ornamental plants, a tilling depth of 4 to 6 inches is usually sufficient, especially for annuals and shallow-rooted plants.
By selecting the appropriate tilling depth and coverage, gardeners can improve soil structure, promote healthy root systems, and create optimal growing conditions for both vegetables and flowers.
Electric Tiller vs Manual Soil Preparation
When preparing soil for gardening, choosing between an electric tiller and manual methods such as digging with a shovel or hoe can greatly affect efficiency, effort, and overall results. Each approach has its uses, but electric tillers offer clear advantages for most home gardening tasks.
Efficiency Comparison
In terms of efficiency, an electric tiller outperforms manual soil preparation significantly. Manual digging requires repeated physical effort to break compacted soil, which can be slow and tiring, especially in larger garden areas. An electric tiller, powered by a motor and rotating tines, can loosen soil quickly and evenly in a single pass. This makes it especially effective for preparing garden beds at the start of the planting season. While manual tools may be suitable for small patches or touch-up work, electric tillers handle broader areas with far greater speed and consistency.
Time and Effort Saved
One of the biggest advantages of using an electric tiller is the time and effort saved. Tasks that might take several hours of manual labor can often be completed in a fraction of the time with a tiller. The machine does most of the hard work, reducing physical strain on the back, arms, and shoulders. This is particularly beneficial for gardeners who manage multiple beds or who prefer a more ergonomic approach to gardening. Electric tillers are also easy to start and operate, requiring minimal setup compared to gas-powered tools or extensive manual preparation.
Consistency of Soil Texture
Achieving a consistent soil texture is another area where electric tillers excel. Manual digging often results in uneven soil, with some areas left compacted and others overworked. An electric tiller breaks soil into uniformly sized particles, creating a smooth and well-aerated planting surface. This uniform texture helps roots grow evenly, improving water absorption and nutrient distribution. Consistent soil preparation also makes it easier to plant seeds at the correct depth and spacing.
In summary, while manual soil preparation can be effective for very small or delicate tasks, an electric tiller provides superior efficiency, saves significant time and effort, and produces a more consistent soil texture. For most home gardeners, an electric tiller is a practical and reliable solution for preparing healthy, productive soil.
Common Mistakes When Using an Electric Tiller
An electric tiller is an effective tool for soil preparation, but improper use can reduce its efficiency and harm soil quality. Avoiding common mistakes helps ensure better results, protects the equipment, and promotes healthier plant growth.
Tilling Wet Soil
One of the most common mistakes is tilling wet soil. When soil is too wet, especially clay-heavy soil, it tends to clump together instead of breaking apart. This can lead to poor soil structure and create hard clods that dry into solid lumps. Wet soil also sticks to the tines, making the tiller harder to control and placing extra strain on the motor. To avoid this issue, always test the soil before tilling. If the soil forms a sticky ball in your hand, it is too wet. The best time to till is when the soil is slightly moist but crumbly.
Over-Tilling
Over-tilling is another frequent mistake that can negatively impact soil health. While it may seem beneficial to till repeatedly to achieve finer soil, excessive tilling actually breaks down soil structure and destroys beneficial microorganisms. Overworked soil becomes loose and powdery, increasing the risk of erosion and compaction after watering or rainfall. It can also reduce organic matter over time. To prevent over-tilling, limit passes to what is necessary—usually one or two passes at the appropriate depth. Allow soil to rest and naturally settle before planting.
Skipping Debris Removal
Failing to remove debris such as rocks, roots, sticks, and garden waste before tilling can cause serious problems. Hard objects can damage the tines, jam the machine, or cause it to bounce unpredictably, creating safety hazards. Debris can also prevent even soil preparation, leaving untreated patches in the garden bed. Before using an electric tiller, clear the area thoroughly and remove visible obstacles. This simple step improves tilling efficiency and extends the life of the equipment.
By avoiding these common mistakes—tilling wet soil, over-tilling, and skipping debris removal—gardeners can use electric tillers more effectively. Proper technique ensures healthier soil, safer operation, and better long-term gardening results.
Safety Tips While Preparing Soil
Using an electric tiller can greatly simplify soil preparation, but safety should always be a top priority. Proper handling, electrical awareness, and the use of protective gear help prevent accidents and ensure a smooth, efficient gardening experience.
Proper Handling
Proper handling of an electric tiller is essential for safe operation. Before starting, read the manufacturer’s instructions to understand the controls, safety features, and operating limits of your specific model. Always maintain a firm, two-handed grip on the handles to keep the tiller stable, especially when working on uneven ground. Start the machine slowly and allow the tines to engage the soil gradually rather than forcing the tiller forward. Let the tool do the work. Avoid sudden movements and remain alert to changes in soil resistance, which can cause the tiller to jerk unexpectedly. When turning or repositioning the tiller, switch it off to prevent accidental contact with moving parts.
Electrical Safety Precautions
Because electric tillers rely on electricity, electrical safety precautions are critical. For corded models, use a heavy-duty, outdoor-rated extension cord and keep it positioned behind you to prevent accidental cutting or tangling. Never operate an electric tiller in wet conditions or during rain, as moisture increases the risk of electric shock. Inspect power cords, plugs, and connections before each use, and do not operate the tiller if any components are damaged. For cordless models, ensure the battery is fully charged and securely installed before starting, and follow the proper charging and storage guidelines recommended by the manufacturer.
Protective Gear
Wearing appropriate protective gear significantly reduces the risk of injury. Sturdy, closed-toe shoes or work boots protect feet from moving tines and flying debris. Gloves improve grip and protect hands from blisters and vibration. Safety glasses or goggles shield eyes from dirt, rocks, and small objects that may be thrown during tilling. Long pants are recommended to protect legs, while hearing protection can be helpful for extended use, even though electric tillers are quieter than gas-powered models.
By following proper handling techniques, observing electrical safety precautions, and wearing the right protective gear, gardeners can prepare soil safely and confidently while minimizing the risk of accidents or equipment damage.
When Not to Use an Electric Tiller
While electric tillers are highly effective for soil preparation in home gardens and small landscaping projects, there are situations where their use is not recommended. Understanding these limitations ensures better results, protects the equipment, and prevents unnecessary strain on the motor.
Rocky Soil Conditions
One scenario to avoid is rocky soil conditions. Electric tillers are designed to work in soil that is relatively free of large rocks, roots, or debris. Rocks can damage the tines, jam the machine, or cause the tiller to bounce unpredictably, creating a safety hazard. Attempting to till rocky soil can also place excessive stress on the motor and gearbox, potentially shortening the lifespan of the equipment. In areas with many rocks, it is better to manually remove the obstacles or use specialized heavy-duty equipment designed for tough terrain.
Extremely Hard or Dry Soil
Electric tillers are also less effective in extremely hard or dry soil. Soil that is too dry becomes compacted and resistant to tilling, which can cause the tines to spin without properly breaking the ground. Operating in these conditions may overheat the motor and reduce the efficiency of the tiller. To prevent damage, avoid tilling during prolonged dry periods, and consider moistening the soil slightly beforehand to make it easier to work. In cases of extremely compacted soil, a gas-powered tiller or a manual digging method may be more suitable.
Large Farming Areas
Lastly, large farming areas are generally not ideal for electric tillers. Most residential electric tillers are designed for small to medium plots and are not built for the continuous operation required on extensive farmland. Tilling large areas with an electric tiller can be time-consuming and may overwork the motor, leading to equipment failure. For larger fields, tractors or heavy-duty gas-powered tillers are more efficient and practical.
In summary, electric tillers are excellent tools for small-scale gardening, but they have limitations. Avoid using them in rocky soil, extremely hard or dry soil, or over large farming areas. Recognizing these limitations ensures safe operation, protects the machine, and promotes better soil preparation outcomes.